1.3. Constructing NeXus Files and Application Definitions
In NeXus Design, we discussed the design of the NeXus format in general terms. In this section a more tutorial style introduction in how to construct a NeXus file is given. As an example a hypothetical instrument named WONI will be used.
Note
If you are looking for a tutorial on reading or writing NeXus data files using the NeXus API, consult the NAPI: NeXus Application Programmer Interface (frozen) chapter. For code examples (with or without NAPI), refer to the Code Examples in Various Languages chapter.
1.3.1. The WOnderful New Instrument (WONI)
Consider yourself to be responsible for some hypothetical WOnderful New Instrument (WONI). You are tasked to ensure that WONI will record data according to the NeXus standard. For the sake of simplicity, WONI bears a strong resemblance to a simple powder diffractometer, but let’s pretend that WONI cannot use any of the existing NXDL application definitions.
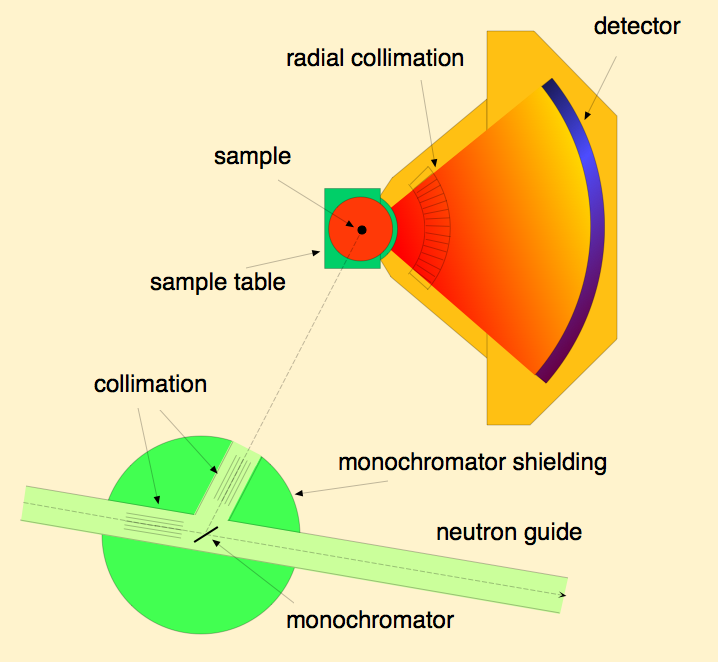
The (fictional) WONI example powder diffractometer
WONI uses collimators and a monochromator to illuminate the sample with neutrons of a selected wavelength as described in The (fictional) WONI example powder diffractometer. The diffracted beam is collected in a large, banana-shaped, position sensitive detector. Typical data looks like Example Powder Diffraction Plot from (fictional) WONI at HYNES. There is a generous background to the data plus quite a number of diffraction peaks.
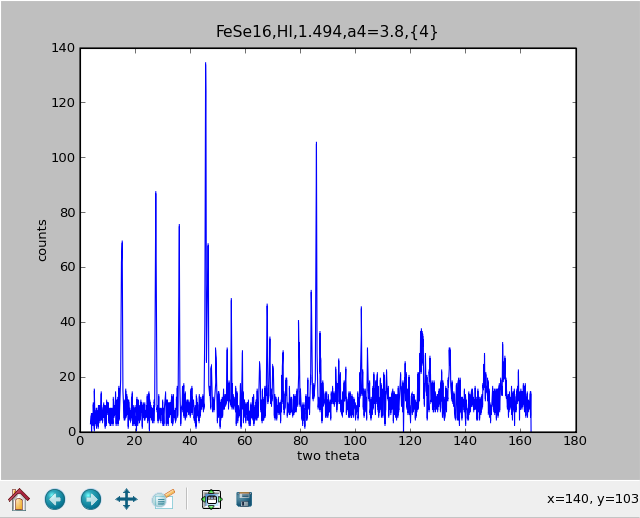
Example Powder Diffraction Plot from (fictional) WONI at HYNES
1.3.2. Constructing a NeXus file for WONI
The starting point for a NeXus file for WONI will be an empty basic NeXus file hierarchy as documented in the next figure. In order to arrive at a full NeXus file, the following steps are required:
For each instrument component, decide which parameters need to be stored
Map the component parameters to NeXus groups and parameters and add the components to the
NXinstrumenthierarchyDecide what needs to go into
NXdata. While this group is optional, you are urged strongly to provide anNXdatagroup to support default plotting.Fill the
NXsampleandNXmonitorgroups
Basic structure of a NeXus file
1  entry:NXentry
2    NXdata
3    NXinstrument
4    NXmonitor
5    NXsample
1.3.2.1. Decide which parameters need to be stored
Now the various groups of this empty NeXus file shell need to be filled. The next step is to look at a design drawing of WONI. Identify all the instrument components like collimators, detectors, monochromators etc. For each component decide which values need to be stored. As NeXus aims to describe the experiment as good as possible, strive to capture as much information as practical.
1.3.2.2. Mapping parameters to NeXus
With the list of parameters to store for each component, consult the reference manual section on the NeXus base classes. You will find that for each of your instruments components there will be a suitable NeXus base class. Add this base class together with a name as a group under NXinstrument in your NeXus file hierarchy. Then consult the possible parameter names in the NeXus base class and match them with the parameters you wish to store for your instruments components.
As an example, consider the monochromator. You may wish to store: the wavelength, the d-value of the reflection used, the type of the monochromator and its angle towards the incoming beam. The reference manual tells you that NXcrystal is the right base class to use. Suitable fields for your parameters can be found in there to. After adding them to the basic NeXus file, the file looks like in the next figure:
Basic structure of a NeXus file with a monochromator added
 1  entry:NXentry
 2    NXdata
 3    NXinstrument
 4       monochromator:Nxcrystal
 5          wavelength
 6          d_spacing
 7          rotation_angle
 8          reflection
 9          type
10    NXmonitor
11    NXsample
If a parameter or even a whole group is missing in order to describe your experiment, do not despair! Contact the NIAC and suggest to add the group or parameter. Give a little documentation what it is for. The NIAC will check that your suggestion is no duplicate and sufficiently documented and will then proceed to enhance the base classes with your suggestion.
A more elaborate example of the mapping process is given in the section Creating a NXDL Specification.
1.3.2.3. Decide on NXdata
The NXdata/ group is supposed to contain the data required to put up a quick plot. For WONI this is a plot of counts versus
two theta (polar_angle in NeXus) as can be seen in Example Powder Diffraction Plot from (fictional) WONI at HYNES. Now, in NXdata, create links to the appropriate
data items in the NXinstrument hierarchy. In the case of WONI, both parameters live in the detector:NXdetector group.
1.3.2.4. Fill in auxiliary Information
Look at the section on NXsample in the NeXus reference manual. Choose appropriate parameters to store for
your samples. Probably at least the name will be needed.
In order to normalize various experimental runs against each other it is necessary to know about the
counting conditions and especially the monitor counts of the monitor used for normalization. The NeXus convention
is to store such information in a control:NXmonitor group at NXentry level. Consult the reference for NXmonitor for
field names. If additional monitors exist within your experiment, they will be stored as additional NXmonitor groups at
entry level.
Consult the documentation for NXentry in order to find out under which names to store information such as
titles, user names, experiment times etc.
A more elaborate example of this process can be found in the following section on creating an application definition.
1.3.3. Creating a NXDL Specification
An NXDL specification for a NeXus file is required if you desire to standardize NeXus files from various sources. Another name for a NXDL description is application definition. A NXDL specification can be used to verify NeXus files to conform to the standard encapsulated in the application definition. The process for constructing a NXDL specification is similar to the one described above for the construction of NeXus files.
One easy way to describe how to store data in the NeXus class structure and to create a NXDL specification is to work through an example. Along the way, we will describe some key decisions that influence our particular choices of metadata selection and data organization. So, on with the example …
1.3.3.1. Application Definition Steps
With all this introductory stuff out of the way, let us look at the process required to define an application definition:
Think! hard about what has to go into the data file.
Map the required fields into the NeXus hierarchy
Describe this map in a NXDL file
Standardize your definition through communication with the NIAC
1.3.3.2. Step 1: Think! hard about data
This is actually the hard bit. There are two things to consider:
What has to go into the data file?
What is the normal plot for this type of data?
For the first part, one of the NeXus guiding principles gives us - Guidance! “A NeXus file must contain all the data necessary for standard data analysis.”
Not more and not less for an application definition. Of course the definition of standard data for analysis or a standard plot depends on the science and the type of data being described. Consult senior scientists in the field about this is if you are unsure. Perhaps you must call an international meeting with domain experts to haggle that out. When considering this, people tend to put in everything which might come up. This is not the way to go.
A key test question is: Is this data item necessary for common data analysis? Only these necessary data items belong in an application definition.
The purpose of an application definition is that an author of upstream software who consumes the file can expect certain data items to be there at well defined places. On the other hand if there is a development in your field which analyzes data in a novel way and requires more data to do it, then it is better to err towards the side of more data.
Now for the case of WONI, the standard data analysis is either Rietveld refinement or profile analysis. For both purposes, the kind of radiation used to probe the sample (for WONI, neutrons), the wavelength of the radiation, the monitor (which tells us how long we counted) used to normalize the data, the counts and the two theta angle of each detector element are all required. Usually, it is desirable to know what is being analyzed, so some metadata would be nice: a title, the sample name and the sample temperature. The data typically being plotted is two theta against counts, as shown in Example Powder Diffraction Plot from (fictional) WONI at HYNES above. Summarizing, the basic information required from WONI is given next.
title of measurement
sample name
sample temperature
counts from the incident beam monitor
type of radiation probe
wavelength (\(\lambda\)) of radiation incident on sample
angle (\(2\theta\) or two theta) of detector elements
counts for each detector element
If you start to worry that this is too little information, hold on, the section on Using an Application Definition (Using an Application Definition) will reveal the secret how to go from an application definition to a practical file.
1.3.3.3. Step 2: Map Data into the NeXus Hierarchy
This step is actually easier then the first one. We need to map the data items
which were collected in Step 1 into the NeXus hierarchy.
A NeXus file hierarchy
starts with an NXentry group. At this stage it is advisable to pull up the base
class definition for NXentry and study it. The first thing you might notice
is that NXentry contains a field named title. Reading
the documentation, you
quickly realize that this is a good place to store our title. So the first mapping
has been found.
title = /NXentry/title
Note
In this example, the mapping descriptions just contain the path strings into the NeXus file hierarchy with the class names of the groups to use. As it turns out, this is the syntax used in NXDL link specifications. How convenient!
Another thing to notice in the NXentry base class is the existence of a group
of class NXsample. This looks like a great place to store information about the
sample. Studying the NXsample base class confirms this view and there are two
new mappings:
1sample name = /NXentry/NXsample/name
2sample temperature = /NXentry/NXsample/temperature
Scanning the NXentry base class further reveals there can be a
NXmonitor group at this level. Looking up the base class for
NXmonitor reveals
that this is the place to store our monitor information.
monitor = /NXentry/NXmonitor/data
For the other data items, there seem to be no solutions in NXentry. But
each of these data items describe the instrument in more detail. NeXus stores
instrument descriptions in the /NXentry/NXinstrument branch of the hierarchy.
Thus, we continue by looking at the definition of the NXinstrument base class.
In there we find further groups for all possible instrument components. Looking
at the schematic of WONI (The (fictional) WONI example powder diffractometer),
we realize that there is a source, a monochromator
and a detector. Suitable groups can be found for these components
in NXinstrument and
further inspection of the appropriate base classes reveals the following further
mappings:
1probe = /NXentry/NXinstrument/NXsource/probe
2wavelength = /NXentry/NXinstrument/NXcrystal/wavelength
3two theta of detector elements = /NXentry/NXinstrument/NXdetector/polar angle
4counts for each detector element = /NXentry/NXinstrument/NXdetector/data
Thus we mapped all our data items into the NeXus hierarchy! What still
needs to be done is to decide upon the content of the NXdata
group in NXentry.
This group describes the data necessary to make a quick plot of the
data. For WONI this is counts versus two theta.
Thus we add this mapping:
1two theta of detector elements = /NXentry/NXdata/polar angle
2counts for each detector element = /NXentry/NXdata/data
The full mapping of WONI data into NeXus is documented in the next table:
WONI data |
NeXus path |
|---|---|
title of measurement |
|
sample name |
|
sample temperature |
|
monitor |
|
type of radiation probe |
|
wavelength of radiation incident on sample |
|
two theta of detector elements |
|
counts for each detector element |
|
two theta of detector elements |
|
counts for each detector element |
|
Looking at this table, one might get concerned that the two theta and counts data
is stored in two places and thus duplicated. Stop worrying, this problem is
solved at the NeXus API level.
Typically NXdata will only hold links to the
corresponding data items in /NXentry/NXinstrument/NXdetector.
In this step problems might occur. The first is that the base class definitions contain a bewildering number of parameters. This is on purpose: the base classes serve as dictionaries which define names for most things which possibly can occur. You do not have to give all that information. Keep it simple and only require data that is needed for typical data analysis for this type of application.
Another problem which can occur is that you require to store information for which there is no name in one of the existing base classes or you have a new instrument component for which there is no base class altogether. New fields and base classes can be introduced if necessary.
In any case please feel free to contact the NIAC via the mailing list with questions or suggestions.
1.3.3.4. Step 3: Describe this map in a NXDL file
This is even easier. Some XML editing is necessary. Fire up your XML editor
of choice and open a file. If your XML editor supports XML schema while editing XML, it is worth
to load nxdl.xsd. Now your XML editor can help you to create a proper NXDL
file. As always, the start is an empty template file. This looks like the XML code below.
Note
This is just the basic XML for a NXDL definition. It is advisable to change some of the documentation strings.
NXDL template file
 1<?xml version="1.0" encoding="UTF-8"?>
 2<!--
 3# NeXus - Neutron and X-ray Common Data Format
 4#
 5# Copyright (C) 2008-2026 NeXus International Advisory Committee (NIAC)
 6#
 7# This library is free software; you can redistribute it and/or
 8# modify it under the terms of the GNU Lesser General Public
 9# License as published by the Free Software Foundation; either
10# version 3 of the License, or (at your option) any later version.
11#
12# This library is distributed in the hope that it will be useful,
13# but WITHOUT ANY WARRANTY; without even the implied warranty of
14# MERCHANTABILITY or FITNESS FOR A PARTICULAR PURPOSE.  See the GNU
15# Lesser General Public License for more details.
16#
17# You should have received a copy of the GNU Lesser General Public
18# License along with this library; if not, write to the Free Software
19# Foundation, Inc., 59 Temple Place, Suite 330, Boston, MA  02111-1307  USA
20#
21# For further information, see https://www.nexusformat.org/
22-->
23<definition name="NX__template__" extends="NXobject" type="group"
24    category="application"
25    xmlns="http://definition.nexusformat.org/nxdl/3.1"
26    xmlns:xsi="http://www.w3.org/2001/XMLSchema-instance"
27    xsi:schemaLocation="http://definition.nexusformat.org/nxdl/3.1 ../nxdl.xsd"
28    >
29    <doc>template for a NXDL application definition</doc>
30</definition>
For example, copy and rename the file to NXwoni.nxdl.xml.
Then, locate the XML root element definition and change the
name attribute (the XML shorthand for this attribute is
/definition/@name) to NXwoni.
Change the doc as well.
The next thing which needs to be done is adding groups into the definition. A group is defined by some XML, as in this example:
1<group type="NXdata">
2
3</group>
The type is the actual NeXus base class this group belongs to. Optionally a
name attribute may be given (default is data).
Next, one needs to include data items, too. The XML for such a data item looks similar to this:
1<field name="polar_angle" type="NX_FLOAT units="NX_ANGLE">
2  <doc>Link to polar angle in /NXentry/NXinstrument/NXdetector</doc>
3  <dimensions rank="1">
4    <dim index="1" value="ndet"/>
5  </dimensions>
6</field>
The meaning of the name attribute is intuitive, the type can be looked
up in the relevant base class definition. A field definition can optionally
contain a doc element which contains a description of the data item. The
dimensions entry specifies the dimensions of the data set.
The size attribute in the dimensions
tag sets the rank
of the data, in this example: rank="1". In the dimensions group there
must be rank dim fields. Each dim tag holds two attributes:
index determines
to which dimension this tag belongs, the 1 means the first dimension.
The value attribute then describes the size of the dimension. These can be plain integers,
variables, such as in the example ndet or even expressions like tof+1.
Thus a NXDL file can be constructed. The full NXDL file for the WONI
example is given in Full listing of the WONI Application Definition.
Clever readers may have noticed the strong similarity between
our working example NXwoni
and NXmonopd since they are essentially identical. Give yourselves
a cookie if you spotted this.
1.3.3.5. Step 4: Standardize with the NIAC
Basically you are done. Your first application definition for NeXus is constructed. In order to make your work a standard for that particular application type, some more steps are required:
Send your application definition to the NIAC for review
Correct your definition per the comments of the NIAC
Cure and use the definition to verify it is ready
After a final review, it becomes the standard
The NIAC must review an application definition before it is accepted as a standard. The curation period is in place in order to gain practical experience with the definition and to sort out bugs from Step 1. In this period, data shall be written and analyzed using the new application definition. No specific time limit is required, but generally the standard should be well vetted by your community and the NIAC.
1.3.3.6. Full listing of the WONI Application Definition
  1<?xml version="1.0" encoding="UTF-8"?>
  2<?xml-stylesheet type="text/xsl" href="nxdlformat.xsl" ?>
  3<!--
  4# NeXus - Neutron and X-ray Common Data Format
  5#
  6# Copyright (C) 2008-2026 NeXus International Advisory Committee (NIAC)
  7#
  8# This library is free software; you can redistribute it and/or
  9# modify it under the terms of the GNU Lesser General Public
 10# License as published by the Free Software Foundation; either
 11# version 3 of the License, or (at your option) any later version.
 12#
 13# This library is distributed in the hope that it will be useful,
 14# but WITHOUT ANY WARRANTY; without even the implied warranty of
 15# MERCHANTABILITY or FITNESS FOR A PARTICULAR PURPOSE.  See the GNU
 16# Lesser General Public License for more details.
 17#
 18# You should have received a copy of the GNU Lesser General Public
 19# License along with this library; if not, write to the Free Software
 20# Foundation, Inc., 59 Temple Place, Suite 330, Boston, MA  02111-1307  USA
 21#
 22# For further information, see http://www.nexusformat.org
 23-->
 24<definition name="NXmonopd" extends="NXobject" type="group"
 25    category="application"
 26    xmlns="http://definition.nexusformat.org/nxdl/3.1"
 27    xmlns:xsi="http://www.w3.org/2001/XMLSchema-instance"
 28    xsi:schemaLocation="http://definition.nexusformat.org/nxdl/3.1 ../nxdl.xsd"
 29    >
 30    <symbols>
 31        <doc>
 32            The symbol(s) listed here will be used below to coordinate datasets with the same shape.
 33        </doc>
 34        <symbol name="i">
 35            <doc>i is the number of wavelengths</doc>
 36        </symbol>
 37        <symbol name="nDet">
 38            <doc>Number of detectors</doc>
 39        </symbol>
 40    </symbols>
 41    <doc>
 42        Monochromatic Neutron and X-Ray Powder diffractometer
 43
 44        Instrument
 45        definition for a powder diffractometer at a monochromatic neutron
 46        or X-ray beam. This is both suited for a powder diffractometer
 47        with a single detector or a powder diffractometer with a position
 48        sensitive detector.
 49    </doc>
 50    <group type="NXentry">
 51        <field name="title"/>
 52        <field name="start_time" type="NX_DATE_TIME"/>
 53        <field name="definition">
 54            <doc> Official NeXus NXDL schema to which this file conforms </doc>
 55            <enumeration>
 56                <item value="NXmonopd"/>
 57            </enumeration>
 58        </field>
 59        <group type="NXinstrument">
 60            <group type="NXsource">
 61                <field name="type"/>
 62                <field name="name"/>
 63                <field name="probe">
 64                    <enumeration>
 65                        <item value="neutron"/>
 66                        <item value="x-ray"/>
 67                        <item value="electron"/>
 68                    </enumeration>
 69                </field>
 70            </group>
 71            <group type="NXcrystal">
 72                <field name="wavelength" type="NX_FLOAT" units="NX_WAVELENGTH">
 73                    <doc>Optimum diffracted wavelength</doc>
 74                    <dimensions rank="1">
 75                        <dim index="1" value="i"/>
 76                    </dimensions>
 77                </field>
 78            </group>
 79            <group type="NXdetector">
 80                <field name="polar_angle" type="NX_FLOAT" axis="1">
 81                  <dimensions rank="1">
 82                    <dim index="1" value="nDet" />
 83                  </dimensions>
 84                </field>
 85                <field name="data" type="NX_INT" signal="1">
 86                  <doc>
 87                    detector signal (usually counts) are already
 88                    corrected for detector efficiency
 89                  </doc>
 90                  <dimensions rank="1">
 91                    <dim index="1" value="nDet" />
 92                  </dimensions>
 93                </field>
 94            </group>
 95        </group>
 96        <group type="NXsample">
 97            <field name="name">
 98                <doc>Descriptive name of sample</doc>
 99            </field>
100            <field name="rotation_angle" type="NX_FLOAT" units="NX_ANGLE">
101                <doc>
102                    Optional rotation angle for the case when the powder diagram
103                    has been obtained through an omega-2theta scan like from a
104                    traditional single detector powder diffractometer
105                </doc>
106            </field>
107        </group>
108        <group type="NXmonitor">
109            <field name="mode">
110                <doc>
111                    Count to a preset value based on either clock time (timer)
112                    or received monitor counts (monitor).
113                </doc>
114                <enumeration>
115                    <item value="monitor"/>
116                    <item value="timer"/>
117                </enumeration>
118            </field>
119            <field name="preset" type="NX_FLOAT">
120                <doc>preset value for time or monitor</doc>
121            </field>
122            <field name="integral" type="NX_FLOAT" units="NX_ANY">
123                <doc>Total integral monitor counts</doc>
124            </field>
125        </group>
126        <group type="NXdata">
127            <link name="polar_angle" target="/NXentry/NXinstrument/NXdetector/polar_angle">
128                <doc>Link to polar angle in /NXentry/NXinstrument/NXdetector</doc>
129            </link>
130            <link name="data" target="/NXentry/NXinstrument/NXdetector/data">
131                <doc>Link to data in /NXentry/NXinstrument/NXdetector</doc>
132            </link>
133        </group>
134    </group>
135</definition>
1.3.3.7. Using an Application Definition
The application definition is like an interface for your data file. In practice files will contain far more information. For this, the extendable capability of NeXus comes in handy. More data can be added, and upstream software relying on the interface defined by the application definition can still retrieve the necessary information without any changes to their code.
NeXus application definitions only standardize classes. You are free to decide upon names of groups, subject to them matching regular expression for NeXus name attributes (see the regular expression pattern for NXDL group and field names in the Naming Conventions section). Note the length limit of 63 characters imposed by HDF5. Please use sensible, descriptive names and separate multi worded names with underscores.
Something most people wish to add is more metadata,
for example in order
to index files into a database of some sort. Go ahead, do so, if applicable, scan
the NeXus base classes for standardized names. For metadata, consider to use
the NXarchive definition. In this context, it is worth to mention that a practical
NeXus file might adhere to more then one application definition. For example,
WONI data files may adhere to both the NXmonopd and NXarchive definitions. The
first for data analysis, the second for indexing into the database.
Often, instrument scientists want to store the complete state of their instrument in data files in order to be able to find out what went wrong if the data is unsatisfactory. Go ahead, do so, please use names from the NeXus base classes.
Site policy might require you to store the names of all your bosses up to the
current head of state in data files. Go ahead, add as many NXuser classes as
required to store that information. Knock yourselves silly over this.
Your Scientific Accounting Department (SAD) may ask of you the preposterous; to store billing information into data files. Go ahead, do so if your judgment allows. Just do not expect the NIAC to provide base classes for this and do not use the prefix NX for your classes.
In most cases, NeXus files will just have one NXentry class group. But it
may be required to store multiple related data sets of the results of data analysis
into the same data file. In this case create more entries. Each entry should be
interpretable standalone, i.e. contain all the information of a complete NXentry
class. Please keep in mind that groups or data items which stay constant across
entries can always be linked to save space. Application definitions describe only
what is included within an NXentry and so have no power to enforce any particular
usage of NXentry groups. However, documentation within and accompanying an
application definition can provide guidance and recommendations on situations where
the use of multiple NXentry groups would be appropriate.
1.3.4. Processed Data
Data reduction and analysis programs are encouraged to store their results in NeXus data files, which may be the same file that contains the raw data. It is recommended to document the actions taken to generate the processed data in a NXprocess group, which has fields to store the name of the program used, its version number, and the date when it was run. If there are multiple processes recorded in the file, the group should also contain a sequence index to specify the order in which they were run. NXprocess groups can also contain one or more NXparameters groups to store the parameters used by the program as well as one or more NXdata groups that contain the results of the process. This has the advantage of encapsulating all the information required to preserve the provenance of the processed data in a single group. However, it is also acceptable to store the resulting data in a NXdata group at the same level as the NXprocess group in the NeXus hierarchy.