2.3.2. EPICS Area Detector Examples
Two examples in this section show how to write NeXus HDF5 data files with EPICS Area Detector images. The first shows how to configure the HDF5 File Writing Plugin of the EPICS Area Detector software. The second example shows how to write an EPICS Area Detector image using Python.
2.3.2.1. HDF5 File Writing Plugin
This example describes how to write a NeXus HDF5 data file
using the EPICS [1] Area Detector [2] HDF5 file writing plugin [3].
We will use the EPICS SimDetector [4] as an example.
(PV prefix: 13SIM1:)
Remember to replace that with the prefix for your detector’s IOC.
One data file will be produced for each image generated by EPICS.
You’ll need AreaDetector version 2.5 or higher to use this as the procedures for using the HDF5 file writing plugin changed with this release.
configuration files
There are two configuration files we must edit to configure an EPICS AreaDetector to write NeXus files using the HDF5 File Writer plugin:
file |
description |
|---|---|
|
what information to know about from EPICS and other sources |
|
where to write that information in the HDF5 file |
Put these files into a known directory where your EPICS IOC can find them.
2.3.2.2. attributes.xml
The attributes file is easy to edit. Any text editor will do. A wide screen will be helpful.
Each <Attribute /> element declares a single ndattribute
which is associated with an area detector image. These ndattribute items can be
written to specific locations in the HDF5 file or placed by
default in a default location.
Note
The attributes file shown here has been reformatted for display in this manual. The downloads section below provides an attributes file with the same content using its wide formatting (one complete Attribute per line). Either version of this file is acceptable.
 1<?xml version="1.0" standalone="no" ?>
 2<!-- Attributes -->
 3<Attributes
 4    xmlns:xsi="http://www.w3.org/2001/XMLSchema-instance"
 5    xsi:noNamespaceSchemaLocation=
 6    "https://github.com/areaDetector/ADCore/blob/master/iocBoot/NDAttributes.xsd"
 7    >
 8    <Attribute name="AcquireTime"
 9               type="EPICS_PV"
10               source="13SIM1:cam1:AcquireTime"
11               dbrtype="DBR_NATIVE"
12               description="Camera acquire time"/>
13    <Attribute name="ImageCounter"
14               type="PARAM"
15               source="ARRAY_COUNTER"
16               datatype="INT"
17               description="Image counter"/>
18    <Attribute name="calc1_val"
19               type="EPICS_PV"
20               source="$(P)userCalc1.VAL"
21               dbrtype="DBR_NATIVE"
22               description="some calculation result"/>
23    <Attribute name="calc2_val"
24               type="EPICS_PV"
25               source="$(P)userCalc2.VAL"
26               dbrtype="DBR_NATIVE"
27               description="another calculation result"/>
28    <Attribute name="MaxSizeX"
29               type="PARAM"
30               source="MAX_SIZE_X"
31               datatype="INT"
32               description="Detector X size"/>
33    <Attribute name="MaxSizeY"
34               type="PARAM"
35               source="MAX_SIZE_Y"
36               datatype="INT"
37               description="Detector Y size"/>
38    <Attribute name="CameraModel"
39               type="PARAM"
40               source="MODEL"
41               datatype="STRING"
42               description="Camera model"/>
43    <Attribute name="CameraManufacturer"
44               type="PARAM"
45               source="MANUFACTURER"
46               datatype="STRING"
47               description="Camera manufacturer"/>
48</Attributes>
If you want to add additional EPICS process variables (PVs)
to be written in the HDF5 file,
create additional <Attribute /> elements (such as the
calc1_val) and modify the name, source, and
description values. Be sure to use a unique name
for each ndattribute in the attributes file.
Note
ndattribute : item specified by
an <Attribute /> element in the attributes file.
2.3.2.3. layout.xml
You might not need to edit the layout file. It will be fine (at least a good starting point) as it is, even if you add PVs (a.k.a. ndattribute) to the attributes.xml file.
 1<?xml version="1.0" standalone="no" ?>
 2<hdf5_layout>
 3  <group name="entry">
 4    <attribute name="NX_class" source="constant" value="NXentry" type="string"/>
 5    <group name="instrument">
 6      <attribute name="NX_class" source="constant" value="NXinstrument" type="string"/>
 7      <group name="detector">
 8        <attribute name="NX_class" source="constant" value="NXdetector" type="string"/>
 9        <dataset name="data" source="detector" det_default="true">
10          <attribute name="NX_class" source="constant" value="SDS" type="string"/>
11          <attribute name="signal" source="constant" value="1" type="int"/>
12          <attribute name="target" source="constant" value="/entry/instrument/detector/data" type="string"/>
13        </dataset>
14        <group name="NDAttributes">
15          <attribute name="NX_class" source="constant" value="NXcollection" type="string"/>
16          <dataset name="ColorMode" source="ndattribute" ndattribute="ColorMode"/>
17        </group>          <!-- end group NDAttribute -->
18      </group>            <!-- end group detector -->
19      <group name="NDAttributes" ndattr_default="true">
20        <attribute name="NX_class" source="constant" value="NXcollection" type="string"/>
21      </group>            <!-- end group NDAttribute (default) -->
22      <group name="performance">
23        <dataset name="timestamp" source="ndattribute"/>
24      </group>            <!-- end group performance -->
25    </group>              <!-- end group instrument -->
26    <group name="data">
27      <attribute name="NX_class" source="constant" value="NXdata" type="string"/>
28      <hardlink name="data" target="/entry/instrument/detector/data"/>
29      <!-- The "target" attribute in /entry/instrument/detector/data is used to
30           tell Nexus utilities that this is a hardlink -->
31    </group>              <!-- end group data -->
32  </group>                <!-- end group entry -->
33</hdf5_layout>
If you do not specify where in the file to write an ndattribute from the
attributes file, it will be written within the group that has
ndattr_default="true". This identifies the group to the
HDF5 file writing plugin as the default location to store
content from the attributes file. In the example layout file,
that default location is the /entry/instrument/NDAttributes group:
<group
      name="NDAttributes"
      ndattr_default="true">
  <attribute
      name="NX_class"
      source="constant"
      value="NXcollection"
      type="string"/>
</group>
To specify where PVs are written in the HDF5 file, you must
create <dataset /> (or <attribute />) elements at the
appropriate place in the NeXus HDF5 file layout. See
the NeXus manual [5] for placement advice if you are unsure.
You reference each ndattribute by its name value from the attributes
file and use it as the value of the ndattribute in the layout file.
In this example, ndattribute="calc1_val" in the
layout file references name="calc1_val" in the attributes file
and will be identified in the HDF5 file by the name userCalc1:
<dataset
   name="userCalc1"
   source="ndattribute"
   ndattribute="calc1_val"/>
Note
A value from the attributes file is only written
either in the default location or in the location named by
a <dataset/> or <attribute/> entry in the layout file.
Expect problems if you define the same ndattribute
in more than one place in the layout file.
You can control when a value is written to the file, using
when="" in the layout file. This can be set to one of these values:
OnFileOpen, OnFileClose
Such as:
<dataset
   name="userCalc1"
   source="ndattribute"
   ndattribute="calc1_val"
   when="OnFileOpen"/>
or:
<attribute
   name="exposure_s"
   source="ndattribute"
   ndattribute="AcquireTime"
   when="OnFileClose"/>
additional configuration
Additional configurations of the EPICS Area Detector and the HDF5 File Plugin are done using the EPICS screens (shown here using caQtDM [6]):
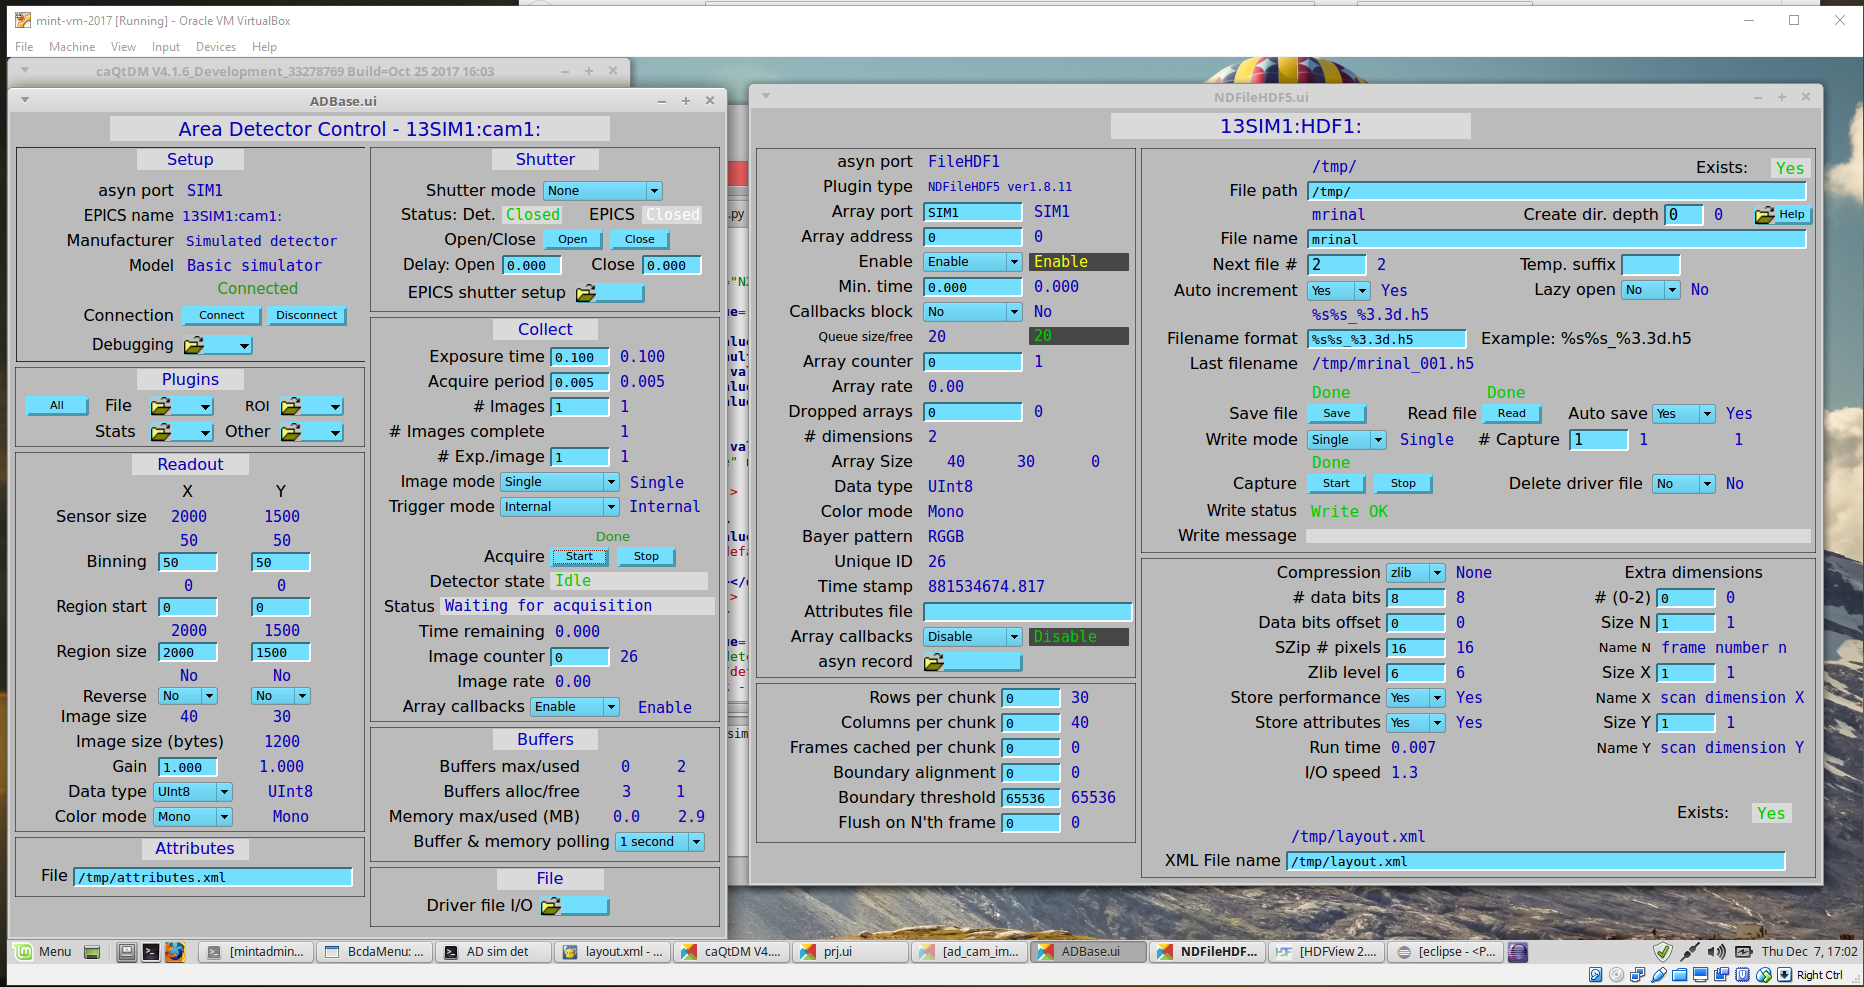
ADBase and NDFileHDF5 configuration screens
Additional configuration on the ADBase screen:
Set Image mode to “Single”
Set Exposure time as you wish
Set # Images to 1
for testing, it is common to bin the data to reduce the image size
The full path to the
attributes.xmlfile goes in the bottom/left File box
Additional configuration on the NDFileHDF5 screen:
Set the File path and “File name” to your choice.
Set Auto save to “Yes”.
Set Compression to “zlib” if you wish (optional)
Set Enable to “Enable” or the HDF5 plugin won’t get images to write!
Set Callbacks block to “Yes” if you want to wait for HDF5 files to finish writing before collecting the next image
The full path to the
layout.xmlfile goes into the bottom/right XML File name boxLeave the Attributes file box empty in this screen.
When you enter the names of these files in the configuration screen boxes, AreaDetector will check the files for errors and let you know.
Example view
We collected data for one image, /tmp/mrinal_001.h5, in the
HDF5 file provided in the downloads section.
You may notice that the values for calc1_val and calc2_val
were arrays rather than single values. That was due to an error in the original
attributes.xml file, which had type="PARAM" instead of type="EPICS_PV".
This has been fixed in the attributes.xml file presented here.
2.3.2.4. Validate the XML files
To validate an XML file, you’ll need the associated .xsd (XML Schema) file,
then use this command:
xmllint --noout --schema path/to/local/schema/file.xsd file_to_validate.xml
These are the XML Schema files to use:
to validate … |
… use this XML Schema file |
|---|---|
|
|
|
|
|
|
|
|
any NXDL file |
|
2.3.2.5. Python code to store an image in a NeXus file
Suppose you want to write area detector images into NeXus HDF5
files python code. Let’s assume
you have the image already in memory in a numpy array, perhaps from
reading a TIFF file or from an EPICS PV using PyEpics. The file
write_nexus_file.py (provided below) reads an image from the sim
detector and writes it to a NeXus HDF5 data file, along with some
additional metadata.
using the h5py package
This example uses the h5py [7] package to write the HDF5 file.
 1import numpy as np
 2import h5py
 3import datetime
 4
 5def write_nexus_file(fname, image, md={}):
 6    """
 7    write the image to a NeXus HDF5 data file
 8
 9    Parameters
10    ----------
11    fname : str
12        name of the file (relative or absolute) to be written
13    image : numpy array
14        the image data
15    md : dictionary
16        key: value where value is something that can be written by h5py
17             (such as str, int, float, numpy array, ...)
18    """
19    nexus = h5py.File(fname, "w")
20    nexus.attrs["filename"] = fname
21    nexus.attrs["file_time"] = datetime.datetime.now().astimezone().isoformat()
22    nexus.attrs["creator"] = "write_nexus_file()"
23    nexus.attrs["H5PY_VERSION"] = h5py.__version__
24
25    # /entry
26    nxentry = nexus.create_group("entry")
27    nxentry.attrs["NX_class"] = "NXentry"
28    nexus.attrs["default"] = nxentry.name
29
30    # /entry/instrument
31    nxinstrument = nxentry.create_group("instrument")
32    nxinstrument.attrs["NX_class"] = "NXinstrument"
33
34    # /entry/instrument/detector
35    nxdetector = nxinstrument.create_group("detector")
36    nxdetector.attrs["NX_class"] = "NXdetector"
37
38    # /entry/instrument/detector/image
39    ds = nxdetector.create_dataset("image", data=image, compression="gzip")
40    ds.attrs["units"] = "counts"
41    ds.attrs["target"] = "/entry/instrument/detector/image"
42
43    # /entry/data
44    nxdata = nxentry.create_group("data")
45    nxdata.attrs["NX_class"] = "NXdata"
46    nxentry.attrs["default"] = nxdata.name
47
48    # /entry/data/data --> /entry/instrument/detector/image
49    nxdata["data"] = nexus["/entry/instrument/detector/image"]
50    nxdata.attrs["signal"] = "data"
51
52    if len(md) > 0:
53        # /entry/instrument/metadata (optional, for metadata)
54        metadata = nxinstrument.create_group("metadata")
55        metadata.attrs["NX_class"] = "NXcollection"
56        for k, v in md.items():
57            try:
58                metadata.create_dataset(k, data=v)
59            except Exception:
60                metadata.create_dataset(k, data=str(v))
61
62    nexus.close()
63
64
65if __name__ == "__main__":
66    """demonstrate how to use this code"""
67    import epics
68    prefix = "13SIM1:"
69    img = epics.caget(prefix+"image1:ArrayData")
70    size_x = epics.caget(prefix+"cam1:ArraySizeX_RBV")
71    size_y = epics.caget(prefix+"cam1:ArraySizeY_RBV")
72    # edit the full image for just the binned data
73    img = img[:size_x*size_y].reshape((size_x, size_y))
74
75    extra_information = dict(
76        unique_id = epics.caget(prefix+"image1:UniqueId_RBV"),
77        size_x = size_x,
78        size_y = size_y,
79        detector_state = epics.caget(prefix+"cam1:DetectorState_RBV"),
80        bitcoin_value="15000",
81    )
82    write_nexus_file("example.h5", img, md=extra_information)
The output from that code is given in the example.h5 file. It has this tree structure:
 1example.h5 : NeXus data file
 2  @H5PY_VERSION = "3.6.0"
 3  @creator = "write_nexus_file()"
 4  @default = "entry"
 5  @file_time = "2022-03-07 14:34:04.418733"
 6  @filename = "example.h5"
 7  entry:NXentry
 8    @NX_class = "NXentry"
 9    @default = "data"
10    data:NXdata
11      @NX_class = "NXdata"
12      @signal = "data"
13      data --> /entry/instrument/detector/image
14    instrument:NXinstrument
15      @NX_class = "NXinstrument"
16      detector:NXdetector
17        @NX_class = "NXdetector"
18        image:NX_UINT8[1024,1024] = __array
19          __array = [
20              [76, 77, 78, '...', 75]
21              [77, 78, 79, '...', 76]
22              [78, 79, 80, '...', 77]
23              ...
24              [75, 76, 77, '...', 74]
25            ]
26          @target = "/entry/instrument/detector/image"
27          @units = "counts"
28      metadata:NXcollection
29        @NX_class = "NXcollection"
30        bitcoin_value:NX_CHAR = b'15000'
31        detector_state:NX_INT64[] =
32        size_x:NX_INT64[] =
33        size_y:NX_INT64[] =
34        unique_id:NX_INT64[] =
Note
Alternatively, the metadata shown in this example might
be placed in the /entry/instrument/detector (NXdetector)
group along with the image data
since it provides image-related information such as size.
In the interest of keeping this example simpler and similar to the one
above using the HDF5 File Writing Plugin, the metadata has been
written into a NXcollection group at /entry/instrument/metadata location.
(Compare with the NXcollection group /entry/instrument/NDAttributes above.)
using the nexusformat package
The nexusformat [8] package for python simplifies the work to create a NeXus file. Rewriting the above code using nexusformat:
 1import numpy as np
 2from nexusformat.nexus import *
 3
 4
 5def write_nexus_file(fname, image, md={}):
 6    """
 7    write the image to a NeXus HDF5 data file
 8
 9    Parameters
10    ----------
11    fname : str
12        name of the file (relative or absolute) to be written
13    image : numpy array
14        the image data
15    md : dictionary
16        key: value where value is something that can be written by h5py
17             (such as str, int, float, numpy array, ...)
18    """
19    nx = NXroot()
20    nx['/entry'] = NXentry(NXinstrument(NXdetector()))
21    nx['entry/instrument/detector/image'] = NXfield(image, units='counts',
22                                                    compression='gzip')
23    nx['entry/data'] = NXdata()
24    nx['entry/data'].makelink(nx['entry/instrument/detector/image'])
25    nx['entry/data'].nxsignal = nx['entry/data/image']
26
27    if len(md) > 0:
28        # /entry/instrument/metadata (optional, for metadata)
29        metadata = nx['/entry/instrument/metadata'] = NXcollection()
30        for k, v in md.items():
31            metadata[k] = v
32
33    nx.save(fname, 'w')
34
35
36if __name__ == "__main__":
37    """demonstrate how to use this code"""
38    import epics
39    prefix = "13SIM1:"
40    img = epics.caget(prefix+"image1:ArrayData")
41    size_x = epics.caget(prefix+"cam1:ArraySizeX_RBV")
42    size_y = epics.caget(prefix+"cam1:ArraySizeY_RBV")
43    # edit the full image for just the binned data
44    img = img[:size_x*size_y].reshape((size_x, size_y))
45
46    extra_information = dict(
47        unique_id = epics.caget(prefix+"image1:UniqueId_RBV"),
48        size_x = size_x,
49        size_y = size_y,
50        detector_state = epics.caget(prefix+"cam1:DetectorState_RBV"),
51        bitcoin_value="15000",
52    )
53    write_nexus_file("example.h5", img, md=extra_information)
2.3.2.6. Visualization
You can visualize the HDF5 files with several programs, such as: hdfview [9], nexpy [10], or pymca [11]. Views of the test image shown using NeXPy (from the HDF5 file) and caQtDM (the image from EPICS) are shown.
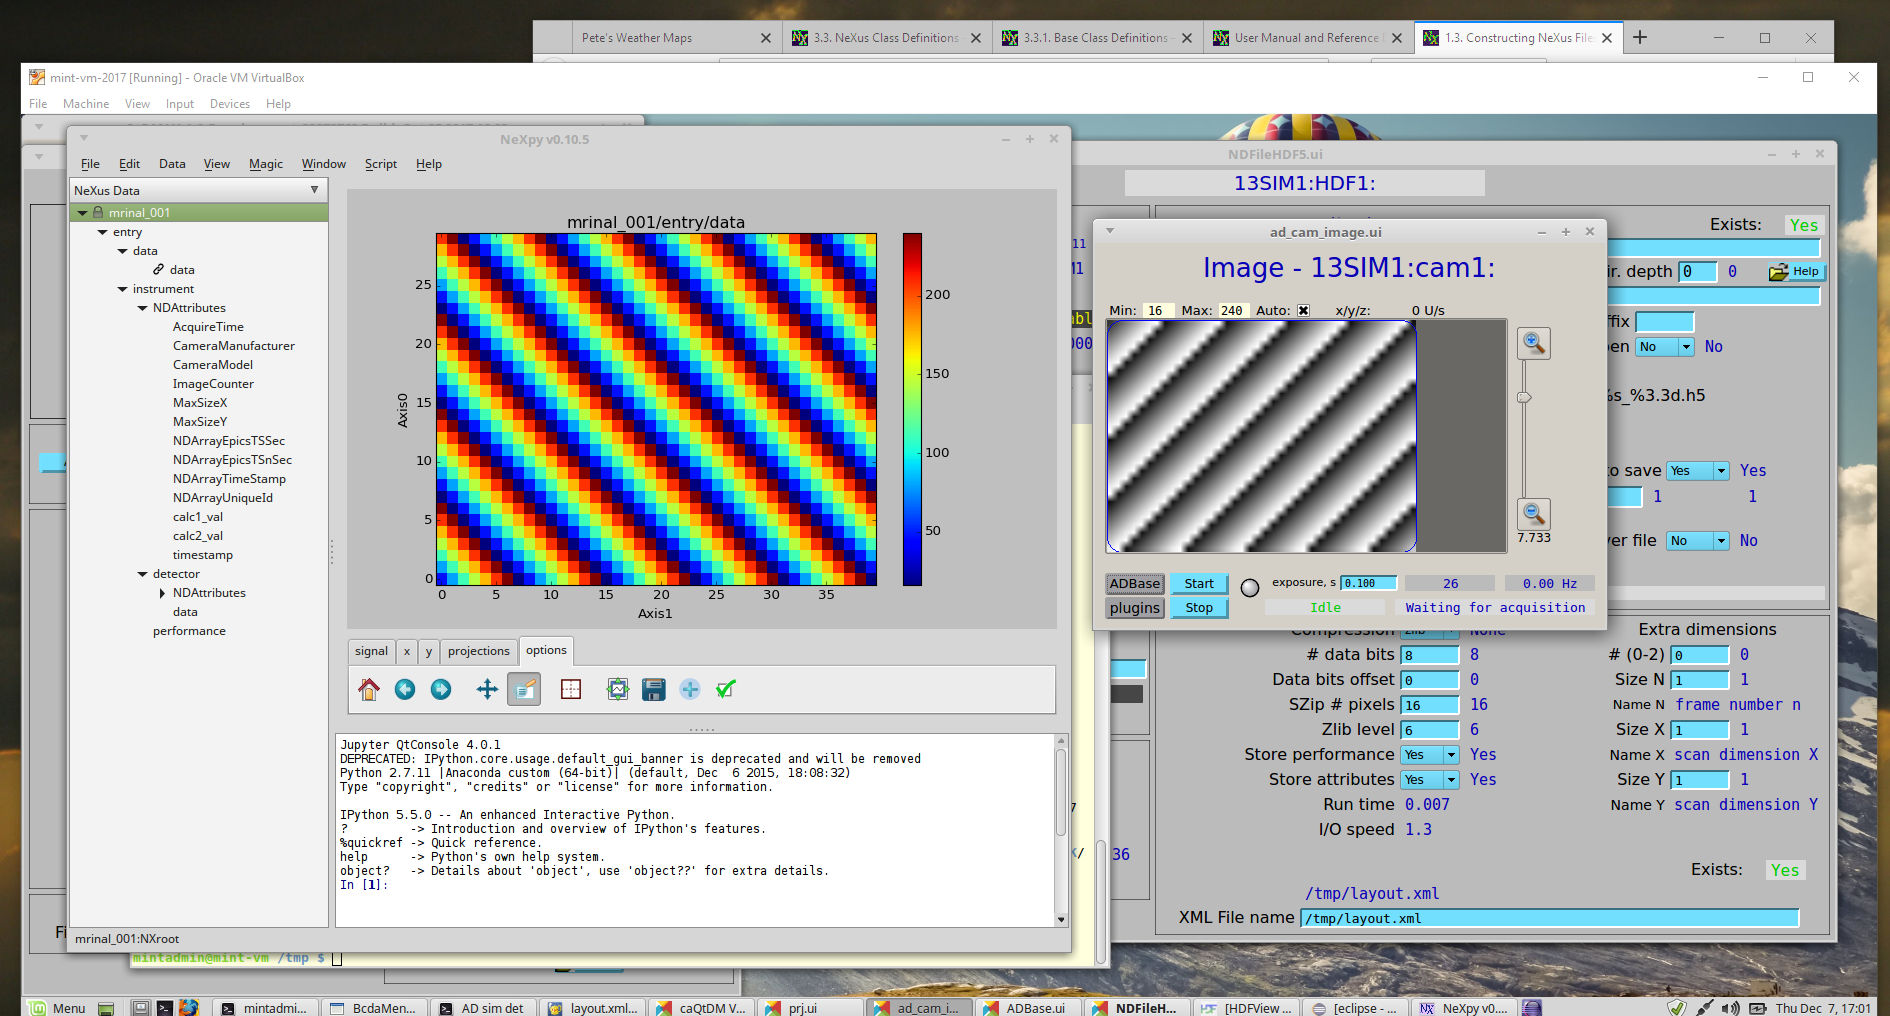
Views of the image in NeXPy (left) and in caQtDM (right)
Get the installation instructions for any of these programs from a web search. Other data analysis programs such as MatLab, IgorPro, and IDL can also read HDF5 files but you might have to work a bit more to get the data to a plot.
2.3.2.7. Downloads
file |
description |
|---|---|
The attributes file |
|
The layout file |
|
example NeXus HDF5 file written from EPICS |
|
Python code to get images from EPICS and write a NeXus file |
|
write_nexus_file.py rewritten with nexusformat package |
|
example NeXus HDF5 file written from Python |